Thursday, September 30, 2010

October SOTM: Share the Magic Blog Hop

Pin It Welcome to the October Stamp of the Month Blog Hop! If you came here from Jen Patrick's blog then you are on the right track. If you are new to the blog hop then just start here and hop from blog to blog following the links to wonderful SOTM artwork done by fellow Close to My Heart consultants. If you get lost along the way, you can see the entire participant list here.

This is such a cute stamp set!  Did you know the Cherry-O papers are perfect for Christmas cards too?  Both the Level 2 papers and the Creative Basics have Tulip (red) and Sweet Leaf (green) in them.  I used the Level 2 paper packet for the card and added Liquid Applique to Santa's beard and cuffs.  I also used the blending pen and the coordinating stamp pads to color in the images.  If you are interested in purchasing this stamp of the month, then you can order it on my website.  Let me know if you have any questions!


Now hop on over to Kimberly's Blog to continue your journey. Pin It

Tuesday, September 28, 2010

Great Studio J Review

Pin It Craft Critique reviewed Studio J and gave it a big thumbs up!  Check out the review here.  OR See for yourself here!
Pin It

Monday, September 27, 2010

Can You Spot the Sept Stamp of the Month?

Pin It
There is only 3 more days to leave a comment and have a chance to win this card!  The September Stamp of the Month isn't just for Halloween!


Leave a comment and I'll draw a winner at the end of the month to receive this card!
Pin It

Friday, September 24, 2010

Do the Puyallup!

Pin It We went to the Puyallup Fair (Western Washington Fair) today and had a blast.  My son is officially tall enough to go on any ride, so he went on the BIG rollercoast twice.  Of course, I forgot my good camera, so had to snap a few with my sorry camera phone. 

Pin It

Thursday, September 23, 2010

Grace with Hooligans - An Oxymoron?

Pin It
Here is another card from my workshop last weekend.  We combined the Grace paper packet (blue Twilight paper) and Hooligans paper packet (Sunset orange paper) to make this autumn card.  Combining Background Papers from different paper packets can really make things interesting.  You would never guess the backside of the Sunset paper has bring purple and black polka dots!


Ingredients
D1439 Spook Alley Stamp Set
D1212 Playful Flourishes
G1012 Hooligans WOTG Kit
X71178 Grace Level 2 Paper Pack
1388 Colonial White 12x12 CS
1244 Garden Green 12x12 CS
Z2120 Garden Green Ink Pad
Z2114 Cocoa Ink Pad
Z1151 3-D Foam Tape
Z1294 Sanding Kit
Z1206 Basic Craft Buttons
Z1088 Chocolate Waxy Flax
Z341 Mini Glue Dots
Z902 Spring Soft Chalks Pin It

Tuesday, September 21, 2010

Let's Party!

Pin It
This was one of my favorite cards from my workshop last weekend.  It's simple and CA-UTE!  I LOVE LOVE LOVE the new colors - Pear and Lagoon too!  I stamped the Party Animal with Black Stazon ink and colored him in using the inside of the Lagoon and Pear stamp pad lids and the blending pen. Hmmmm I may have to add googly eyes too.  What do you think?


Ingredients
1437 Party Animal Stamp Set
G1012 Hooligans WOTG Kit
1320 8½ x 11 White CS
Z888 Black Stazon Pad
Z890 Stazon Cleaner
Z2195 Lagoon Ink Pad
Z2197 Pear Ink Pad
3174 Blending Pen
Z1034 Black Ribbon Rounds
Z1151 3-D Foam Tape Pin It

Sunday, September 19, 2010

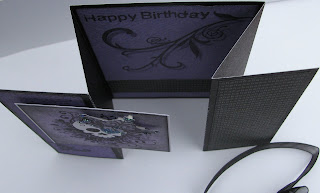
Gate Fold Thriller Birthday Card

Pin It
Gate Fold Cards are so much fun!  They fit my stamping-enjoyment criteria: 1) Can't take too long  2) Seem really difficult, but aren't  3) Causes people to say, "wow!"
Here is a sample I made using the CTMH September Stamp of the Month: Thriller and the Hooligans paper packet.  Let me know if you have any questions or feel free to leave a comment if you like it!  Thanks!


Scoring 5 1/2" x 12" Cardstock

If you'd like to see more great Halloween ideas, you can hop to other blogs here.
Pin It

Saturday, September 18, 2010

M&M Stix Tutorial

Pin It
 I saw this on Splitcoast and had to give it a try.  I thought it was such a cute idea that can be used for just about any occasion!


All Supplies are Close to My Heart
D1439 Spook Alley Stamp Set
G1012 Hooligans WOTG Kit -
     1 1/2" x 3 1/4" White CS
     1 5/8" x 3 3/8" Black CS
     1 3/4" x 3 1/2 Pear CS
     2" x 2" Pear CS
3505 Watercolor Pencils
Z1089 Black Waxy Flax
Z2103 Black Ink Pad
Z2197 Pear Ink Pad
3174 Blending Pen
Z1311 Circle Punch
Z679 Liquid Glass
Z697 Sponge
Googly Eyes
1" x 8" Lip & Tape Bags from http://www.gtbags.com/
3"x9" Piece of text weight paper, rolled up to fit inside bag
Wooden skewer
M&M's
 
  • Take the rolled piece of text weight paper and push it into the bag to use as a funnel
  • Push the end up slightly with your finger to create a flatter surface for the first M&M
  • Use the skewer to help make the M&M horizontal
  • Drop the other M&M's down the funnel in a pattern

 
  • Keep pulling the funnel up as you drop down the M&M's so the candy doesn't get stuck inside the funnel.
  • After all of the M&M's are added to the bag use ribbon, string, or waxy flax to tie the top close to the M&M's so they don't move.
  • Wrap the ends of waxy flax around the skewer to curl them
  • Peel off the backing of the bag and stick it down to seal.
  • Now onto the tag!
  • Stamp your stamp onto the White cardstock using black ink
  • Ink up a wedge of a sponge with Pear ink.  (I like to use DollarTree chip clips to hold my sponge wedges.)
  • Layer and glue/tape together the white, black, and Pear cardstock pieces
  • Use watercolor pencils to color the bat with purple.  I like to add the color to the bottom portions of the image to give the illusion of light and shadows.
  • Use the Blending Pen to blend the purple pencil into the rest of the image
  • Punch a circle using the 1 1/4" circle punch
  • Fold the circle in half and punch through the half moon with a 1/4" hole punch
 
  • Tape it to the end of the tag and punch through the hole and the tag
  • Tie the tag to the bag
Now for the extra touch - Googly Eyes!  I had to search through my craft supplies to find these, but it was worth it!  Use a tiny dot of Liquid Glass on the eyes of the bat and add the googly eyes.
Finished!


Other Stix Ideas:
Skittles
Peanut M&M's will fit end to end
2"x8" bags will fit Peppermint Patties!

Pin It

Sunday, September 12, 2010

Hooligans with Party Pennants

Pin It


The Hooligans paper is so much fun!  I love using it with the Party Pennants stamp set.  It is a great alternative if you aren't into Halloween.  I used the Hooligans Workshop on the Go kit because it comes with the ribbon and the accents (buttons).  The "string" is Black Waxy Flax fastened over the dotted stamped image.  We will make a similar card at my workshop this coming Saturday.  Let me know if you'd like to join us!
Pin It

Friday, September 10, 2010

Sept SOTM Thriller ROCKSTAR Card

Pin It
Sometimes when you make a card you look at it and aren't completely happy, but that isn't the case this time.  I love this card!  I'm usually not the skull and crossbones type of person, but this is a really fun set to work with.  I guess I'm getting tired of making flower cards or something, but this set IS truly fun!  If you know a child between the ages of 7 and 20 then you know this style is all-the-rage.  I hope you like the card too!  I will post another one of my favorites using this set within the next couple of days.
  

Recipe
Sept Stamp of the Month: Thriller
Simple Stitches Stamp Set
You Rock Stamp Set
Cocoa Cardstock (5x10)
Colonial White cardstock (4x4)
Cardboard from CTMH Shipping Box (4 1/2 x 4 3/4)
Silver Brads (medium and bigger)
Stapler
Cocoa Ink Pad
Indian Corn Blue Ink Pad
Cranberry Ink Pad
Goldrush Ink Pad
Garden Green Ink Pad
Piercing Tool
Edge Distresser
Sanding Block

Instructions
  • Using a sponge, rub the Indian Corn Blue, Garden Green, and Goldrush ink pads in a circular motion around the Colonial White Cardstock. 
  • Stamp the skull on the card using 2nd generation Indian Corn Blue
  • Stamp a small star in 2nd generation Cranberry ink (the star I used is from a stamp set from the You Rock WOTG kit, but I can't remember the name right now)
  • Stamp "ROCKSTAR" on the cardstock using 1st generation ink
  • Stamp the stitches around the edge of the Colonial White CS using 2nd generation Cocoa Ink
  • Run the Cocoa Ink Pad around the edges of the Colonial White CS
  • Use the Piercing Tool to make holes where the faux holes are from the stitches stamp.  It's amazing how real this looks without having to break out your grandmother's sewing machine!
  • Use the Edge Distresser around the edges and roll up slightly with your fingers
  • Cut a piece of cardboard from a box and tear the outer layer to expose the inside corrigated material
  • Glue the Colonial White cardstock to the corrigated cardboard at an angle
  • Add two staples in an "X" pattern to the top right of the cardstock and cardboard
  • Using the Piercing Tool, create holes to the bottom/left
  • Add the silver brads to the holes
  • Sand the edges of the Cocoa card
  • Glue the cardboard and Colonial White CS to the Cocoa card with the fold at the top
*Card idea from Stamp It Magazine 4/2010.  "You Rock!" card made by Kim Hughes. Pin It

Tuesday, September 7, 2010

Mistletoe Memories StampFest 2010

Pin It
You're Invited to Join Us for a
Day of Stamping and Scrapbooking!

at the

Mistletoe Memories StampFest

on October 16th from 1-8pm
in Lakewood, WA

$25 Registration includes:
Holiday Workshop Projects
Dinner
Special Treat
Q&A Time with Me!
Fun Time with Friends!

Please email me or leave a comment below and I will send you the flyer and registration form.  Let me know if you have any questions! I hope to see you at this event or at my September 18th Hooligans workshop too.
Pin It

Monday, September 6, 2010

Cherry-O Card

Pin It
Here is one of my favorite cards I made using the Cherry-O papers.  It uses a 4 1/4" x 5 1/2" Heavenly Blue card with Chocolate cardstock layered on top of that using foam tape slightly toward the upper left corner.  Over the Chocolate is a cute checked piece of B&T paper from the Cherry-O Level 2 kit and a piece of Colonial White cardstock underneath. A Cranberry Grosgrain ribbon is tied around the Chocolate CS and tied in a knot between the B&T paper and Colonial White CS.  "Thinking of You" is stamped in Chocolate ink below the knot using the Say it in Style stamp set.  Let me know if you have any questions!  All products can be found on my website. Pin It

Sunday, September 5, 2010

Seize the Day

Pin It
This is a card we made at my August Workshop.  See below for the recipe and how-to.  I hope you can join me at my September Workshop coming soon!

Recipe

Item# Description Page Price
G1008 Cherry O WOTG Kit Flyer 29.95
D1424 August: Something Splendid Set 109 0-22.95
Z2106 Blush Ink Pad 101 5.25
Z2111 Chocolate Ink Pad 100 5.25
1285 Heavenly Blue CS 101 9.50
1388 Colonial White CS 100 9.50
Z1294 Sanding Kit 97 3.50
Z1151 3-D Foam Tape 96 5.95
Z697 Sponge 98 1.25
Z1102 Colonial White Grosgrain Ribbon 90 6.95
Z1217 Metal Brad Assort 92 4.95

How-To
Take a 4 1/4" x 5 1/2" Chocolate card and sand the front using the sanding block.  (Mostly the top, no need for the bottom because it will be covered by background paper.)  Using the Chocolate Ink Pad, distress the edges of all the paper and even the Colonial White Grosgrain Ribbon.  Stamp "Seize the Day" onto a small piece of Colonial White Cardstock.  Ink the small flower from the wonderful "Something Splendid" Stamp of the Month with Blush Ink and dab Chocolate Ink on it using a sponge or sponge dauber.  Stamp 5 of them onto a piece of Colonial White CS.  Add silver or pewter brads to the center of the flowers.  Put card together as shown.  Use a piece of foam tape to add the saying onto the card.  Let me know if you have any questions! Pin It