Showing posts with label Card. Show all posts

Sunday, March 18, 2012

Stella Workshop Cards

Pin It
We had a wonderful time at my workshop on Saturday.  Thank you to everyone that attended!  Here are the fun projects that we made including the ingredients in case you would like to order them for yourself.  Let me know if you have any questions!


A Note for You Card
D1504  Fashionista
G1032  Stella Wrkshp on the Go
1301  Bamboo Cardstock
Z2111  Cocoa Stamp Pad
Z1151  3-D Foam Tape
Z2114  Cocoa Ink Pad
Z2103  Bamboo Ink Pad
Z1316  Cocoa Ribbon

 
“Chair”ish You Card
G1032  Stella Workshop on the Go Kit 
Z1686  Cricut Art Philosophy Collection
Z2137  Olive Stamp Pad
Z2111  Cocoa Stamp Pad 
Z1366  Metal Brad Assort. 
Z1114  Piercing Tool Kit
Z1615  Red Designer Ribbon
Z1151  3-D Foam Tape
Z578  Corner Rounder


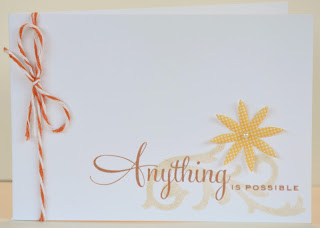
Anything is Possible Card
S1203  March SOTM: Potential
Z1710  Paradise Paper Flowers
Z1707  Bitty Opaque Pearl Gems
Z1702  Paradise Baker’s Twine
Z2167  Crème Brulee Stamp Pad
Z2191  Sunset Stamp Pad
X5900  White 12x12 Cardstock


Love Who You Are Card
B1398  Just for You Stamp Set
G1032  Stella Workshop on the Go Kit
Z1686  Cricut Art Philosophy Collection
Z2195  Lagoon Stamp Pad
Z2111  Cocoa Stamp Pad
Z2191  Sunset Stamp Pad
Z2166  Tulip Stamp Pad
Z697  Sponge
Z1706  Durables Studs: Round
Z1705  Durables Studs: Square
Z1151   3-D Foam Tape

Purse
D1491  Hooray Bouquet Stamp Set
G1032  Stella Workshop on the Go Kit
Z1686  Cricut Art Philosophy Collection
Z1366  Metal Brad Assort.
Z1114  Piercing Tool Kit
Z2191  Sunset Stamp Pad


 Order All Supplies Here!

 *Designs © CTMH Co.
Pin It

Thursday, March 8, 2012

Desk Scraps - What to Do with Them?

Pin It
Turn them into a card!  I was finding cleaning off my desk the other day and came across a few items that I just couldn't manage to toss in the garbage.  I spent the time creating these roses and dying the ribbon, so I might as well make a card with them!  I also had this stamp sitting there needing to be put away, so why not use that as well right!?  I think it turned out pretty neat for throwing a few scraps together.  What do you think?
Pin It

Monday, February 27, 2012

Florentine Spiral Flower Card - Plus TIPS!

Pin It

 
Before
These spiral flowers from the Cricut Art Philosophy Cartridge are so much fun!  They were the theme of my team's meeting this month and this was my swap card.  I've certainly learned some do's and don'ts after making 12 of these cards.  Here are my discoveries:
Don't
  1. Try to roll them up with just your fingers.
  2. Just leave the cardstock plain - a little color around the edges makes all the difference!
  3. Leave the cardstock stiff
Do
  1. Try rubbing two different colors on the spiral before rolling it up. For this card I rubbed Bamboo ink over a flat Colonial White spiral flower cut from the Cricut Art Philosophy Cartridge. After that, I used a sponge dauber and Creme Brulee ink to sponge a little warm yellow around the edges.
  2. MIST the spiral flower ONCE on both sides before rolling it up.  This makes it more pliable and allows you to roll the petals back, creating a more natural looking rose that lays more flat on your card. THIS IS THE MOST IMPORTANT STEP!
  3. Use a skewer to start on the outside end and roll it toward you. Once you get toward the center, the skewer might get in your way so you may need to set it aside and finish with just your fingers.
  4. Once it is completely rolled up, LET IT GO!  Don't hold it tight! (Oops, that was a "don't.") It will naturally stay rolled, but if you take your hands off of it then it will look more natural and open a little bit.
  5. Use a generous amount of Liquid Glass on the center circle to hold the "petals" down. Just hold it together for a minute and it will dry enough to move on to the next one.
Featured Supplies:
Cricut Art Philosophy Cartridge
Florentine Level 2 Paper Packet
Card Chatter - Sympathy


Pin It

Florentine Mini Cards

Pin It

We made these cuties at our team meeting this month.  We used the beautiful Florentine papers and ribbon that come in the Workshop on the Go Kit. The ribbon is so much fun!  I just laid it on scratch paper and turned the stamp pad upside down on it.  The more you swipe the ribbon with the ink, the darker the color gets.  I used the Desert Sand pad and it produced a beautiful pewter color.  We also used the Stippling Brush with a tiny bit on Create-a-Shade Paint to add an iridescent sheen to the flowers.  You can see it a little bit in the second picture.

All supplies can be found on MY WEBSITE:

Card Word Puzzle Stamp Set
Florentine Paper Packet
(3) 3 1/2 x 5 Colonial white Cardstock
1 x 2 1/2 Creme Brulee patterned B&T
1/2 x 2 1/2 twilight b&t
2 x 2 1/4 Sm Floral w/cream background B&T paper
1 3/4 x 2 1/4 Cream Brûlée B&T
2 1/2 x 3 1/2 Light Simple pattern B&T
2 x 3 1/4 Twilight B&T
9" Color Ready Seam Binding Ribbon
Antique Copper Brads
Create a Shade Paint
Stipple Brush
Empty My Accents Jar
Small Scissors
Piercing Tool
Adhesive
Stamp Pads: Cocoa, Twilight, Desert Sand
Foam Tape
Acrylic Blocks: 1x1 2x2, 1x3 1/2
Stamp Cleaner/pad


Pin It

Sunday, February 19, 2012

Workshop Cards

Pin It


These are a few cards that we made at my workshop yesterday. The first two use the February Stamp of the Month.  Here are the ingredients in case you would like to duplicate them.  The blue font indicates that the product is new.  All products can be ordered HERE


Many Thanks Card
 Item #      Description               Pg    Price
S1202         Thoughtful Tidings SOTM         139  5-17.95
Z1738         Colonial White Die-Cut Cards    123        6.95
G1038         Florentine Workshop on the Go  55         29.95
D1704         Pewter Bedge Buttons               125  4.95
1301            Bamboo Cardstock                      8     14.50
Z2114          Cocoa Ink Pad                           8     5.25
Z2103         Bamboo Ink Pad                          8     5.25
Z1471          CTMH Ruler                             134 9.95
Z1114          Piercing Tool Kit                       133 5.95


Thanks Card
A1125          Thanks Stamp                   93   6.95
Z1686         Cricut Art Philosophy Collection 13     99.00
Z2105         Black Ink Pad                   8     5.25
1301            Bamboo Cardstock           8     14.50
1388            Colonial White Cardstock    8     9.50
1386            Black Cardstock                   8     14.50
Z1151          3-D Foam Tape                   134 5.95
Z1707         Bitty Opaques Pearl Gems 126 2.95


You Touch So Many Lives Card
S1202         Thoughtful Tidings SOTM  139  5-17.95
Z1686         Cricut Art Philosophy Collection 13     99.00
X5906         Dark Green Shade Paper Pack          9                   7.95
X5754         Crème Brulee Cardstock    9     14.50
1388            Colonial White Cardstock    8     9.50
Z1617          Dark Chocolate Striped Grosgrain 124 6.95
Z1333          Mocha Opaque Gems 126 2.95
Z1151            3-D Foam Tape 134 5.95


Pin It

Saturday, February 4, 2012

Valentine Garland

Pin It
I have to brag. My team is SO FANTASTIC!  Aren't these little cards the cutest?  At my last team meeting we did a 3x3 swap using the NEW Stella paper packet and we added them to some NEW twine to create this adorable garland.  I don't seem to have any Valentine decorations around my house, so this is perfect!


Thank you to Cindy Kleinfelter, Sharon Esau, Brandee Pittenger, Kelly Wittner, Joyce Glass, Anna Murray, Mina Bingham, Dee Blackburn, and Linda Holliday! I am blessed to know you!
Pin It

Another Faux Stitching Card

Pin It
Here is another Faux Stitching Card that we made at my last team meeting.  I love this technique!  For my previous click here.

Stamp Set: Remarkable Wreath


Pin It

Saturday, January 14, 2012

Rock the Block - Valentine's Day Card with New Easy Faux-Stitching Technique!

Pin It


I love the look of sewn cards, but honestly I cannot sew a straight line on fabric, much less, a card.  Well one of my fantastic fellow consultants, Tresa Black, came up with this great idea!  We are making this one at my workshop on Jan 21st, so let me know if you would like to attend or order the supplies to make it.
    Supplies:
    Remarkable Wreath (one of my favorites in this Idea Book!)
    Rock the Block Stamp Set (I used dotted background stamp around the edges)
    Cocoa Ink Pad
    Tulip Ink Pad
    Bamboo Ink Pad
    Bamboo Cardstock
    Sanding Block
    CTMH Ruler
    Pin It

    Friday, January 13, 2012

    January Stamp of the Month: Little Reminder

    Pin It
    The January Stamp of the Month can be used for just about any occasion!  The numbers and calendar in this set are perfect for anniversaries, birthdays, new babies, etc!  Here is a baby card I made using the little numbered circle as a background stamp on the butterfly I cut from my Cricut Art Philosophy Cartridge.  I got the butterfly idea from a fellow CTMH consultant, Krista Hershberger.  Isn't it adorable!?  I also cut the cute scalloped card using the Cricut cartridge.  We will make this at my workshop on January 21st if you are interested in making one as well.  RSVP if you live in the area, or place an order of $20 or more and I will send you the supplies for $5!*

    Supplies:

    Order today!

    *Shipping charges may apply
    Pin It

    Wednesday, January 11, 2012

    Rock the Block Card

    Pin It
    I made this fun Valentine using the Rock the Block special that is available this month only.  Of course, I had to use my Cricut Art Philosophy Cartridge as well to create the beautiful flower and leaves!  If you like this card then join me at my workshop on January 21st!

    Supplies:
    Roxie Paper Packet
    Rock the Block Special
    Cocoa Ink Pad
    Bamboo Ink Pad
    Sponge Daubers
    Mocha Adhesive Gems
    Liquid Glass
    Order Here! Pin It

    Tuesday, December 27, 2011

    Happy Holidays Card #2

    Pin It
    Here is another one of my Christmas cards this year. I love love love the Wonderland Paper Packet.  Can you see the little touches of Prisma Glitter on the snow?  It is amazing how it can make the whole card more interesting!
    Pin It

    Saturday, December 24, 2011

    Happy Holidays!

    Pin It
    Wishing you all a very
    Merry Christmas and a Happy New Year!

    Pin It

    Tuesday, December 13, 2011

    December Stamp of the Month ~ Valentine's Day Card

    Pin It
    Here is a sweet little card I made using the adorable December Stamp of the Month.  It is a 3" x 4 3/4" card so you can get several of these out of one 12x12 piece of cardstock.  They would make great Valentines!

    Products Used:
    Cricut Art Philosophy Cartridge (to cut out the heart)
    December Stamp of the Month: Mad About You
    Elemental Workshop Kit
    Cocoa Ribbon
    Sorbet Ink Pad
    Chocolate Ink Pad
    Round Sponge
    Clear Sparkles Pin It

    Monday, December 5, 2011

    Workshop Cards

    Pin It
    Here are the cards we made at my last workshop.  We also made a hot chocolate holder that I will show shortly, so check back within the next few days!


    Recipe: Wonderland Workshop on the Go Kit, Nov Stamp of the Month, Nov Special Pin It

    Tuesday, October 25, 2011

    Folded Tree Card

    Pin It
    Here is another version of the Folded Tree Card. You just take three 4x4 pieces of cardstock and score them diagonally. Use a bone folder to fold the score lines. Place one diagonal in front of you, then the other two are placed on top of it side-by-side as show below. Add adhesive to the upper area of the center square and use a small piece of velco on the corner of right hand square so it can hold it together and stand up. The velco will be undone in order to lay flat to mail. Let me know if you have any questions!


    Pin It

    Tuesday, October 11, 2011

    Folded Tree Card

    Pin It We made this adorable card at my team meeting tonight.  (Thanks Sharon Esau!)  It folds flat and fits in an envelope!  I will have it out at my workshop on October 22nd in case you would like to see it!

    Update: You can find the instructions here.


    Pin It

    Monday, September 26, 2011

    Inside Out Distressing Card - Get the Card and Tutorial Here!

    Pin It
    Several people expressed interest in this card, but weren't able to attend my workshop last Saturday, therefore I'm offering a special online tutorial! With just an order of $15 or more, I will mail you this card and send you a password to view a video tutorial on how to do this new "Inside Out Distressing" technique! Just email me with your order before Friday. Don't forget to check out the Stamp of the Month and the double Pair-a-Phrase stamp set too!  I will place a large order on Friday, so if you live near Tacoma, WA then you can save on shipping.  You can order two ways:

    1) If you live near Tacoma, WA then email me with your order by viewing the Idea Book/Catalog
    2) If you want your order shipped directly to you then Order Here!

    Pin It

    Thursday, August 11, 2011

    Roxie with New Kraft Die Cut Cards!

    Pin It
    Here is another card we made at my last workshop where we used the new Roxie paper packet along with the Kraft Die Cut Cards.  I love the combo of these two!  Add our new Bling and it's perfect!


    Recipe
    C1461 Salutation Seals
    Z1474 Kraft Die-Cut Cards & Envelopes
    G1025 WOTG Roxie Kit
    Z1392 2” Scallop Circle Punch
    Z2105 Black Ink Pad
    Z1151 Foam Tape
    Order these! Pin It