Monday, April 30, 2012

CTMH May Stamp of the Month "Friendship Bouquet" Blog Hop

Pin It Welcome to our Stamp of the Month Blog Hop!  This month we have over 50 Close To My Heart Consultants sharing their creations on their blogs using May's SOTM, "Friendship Bouquet."  This is simple to do - just click on the link at the end of the post on each blog to move to the next one! The blog hop is a great big circle, so you can start here and work your way all around. If you have come here from Wanda Riley, you are on the right path! Here we go!  Here are the images in the set:


Below is the card I made using the stamp of the month along with a description of a new technique that I call "Spray Watercolor."  I love it because the water does the work for you by blending the colors together giving it a more natural watercolor look.  


Technique: 1) I stamped the sunflower with Black Stazon Ink and then colored most of it with Watercolor Pencils.  2) Then I simply just used my little spray bottle and saturated the Colonial White cardstock.  3) I placed it between a few pieces of paper and set a few books on top to flatten it out before I added it to my card.  The card base and background papers use the adorable Pemberley papers.  Let me know if you have any questions!

Quick coloring using watercolor pencils
Use a spray bottle to saturate the paper to blend colors
After water was added
The images in the set

Now hop on over to Jen Patrick's blog to see what she created! If you get lost along the way then you can view the entire list HERE.
Pin It

Monday, April 23, 2012

May CTMH Workshop!

Pin It
Spring is here and I am ready for some girly colors!  Join us at the May workshop and make 5 pretty projects!

When: Sat, May 19th from 10:00am - 12:30pm
Place:  My Stamp Studio in Fircrest, WA
RSVP: Please RSVP before Wed, May 16 or when full*
Cost: $5 Supply fee with any order of $20 or more or a $25 workshop fee


*If you need to cancel then your stamped supplies will be provided to you. Pin It

Thursday, April 19, 2012

Fit Your Cricut Cuts Perfectly Onto Your CTMH Dimensional Elements Tags

Pin It Pin It

Wednesday, April 11, 2012

Backpack Mini Album Using CTMH Superhero Papers

Pin It
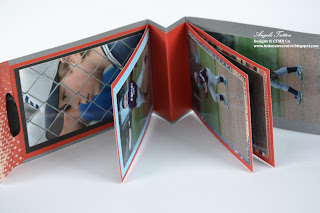
As a consultant, sometimes it is easy to be so focused on your work that you forget to do something for yourself. That is why I'm honored to be in a group called the Inky Fingers that meets about every other month for some papercrafting fun. My friend Caryl invited me to their group and I just love the projects that they come up with!  We haven't met yet this month, but I heard about the project and just had to share it with my CTMH team ASAP!  Thankfully Sabine sent me the link to the directions so I could prepare for the meeting early.  Thanks Sabine!  She found the directions here in case you would like to make one too, but see below for a few tweaks that I made. Here is my little mini album of my son. (Isn't he too cute!?)


Little mini magnets are attached using Liquid Glass to hold the flaps down.

Supplies:
Qty    Description
  • Superhero Paper Packet
  • (1) 3 x 11 strip of cardstock (Gray Wool)
  • (2) 2 3/4 x 11 strips of cardstock (Cranberry)
  • (7) 2 1/2 x 4 1/4 assorted pieces of coordinating B&T paper and cardstock
  • (1) 2 3/4 x 3 B&T (blue "Wack, Crush, Splat!")
  • (1) 5 x 5 B&T (striped)
  • (1) 2 1/4 x 2 1/4 B&T (stars)
  • (2) Brads
  • 18" ribbon (medium width black satin ribbon)
  • Corner Rounder
  • Liquid Glass
  • Bone Folder
  • 1/8" hole punch
  • 1 1/2" circle punch
  • Paper Trimmer with regular and scoring blade
  • Piercing Tool for brads
  • Scissors
  • Any ruler
  • Tombow Adhesive
  • Other coordinating accents (star dimensional element, sponge dauber, Moonstruck ink pad)
  • 8-10 small photos
 Tips:
  • The original directions weren't quite clear as to what to do with the ends of the ribbon straps. I tried just tying the ends together in the back, but the knot was too bulky.  Instead, I taped the ends to the inside of the back and then just glued the back page to it to cover it up. Now it lays nice and flat!
  • The mini magnets were quite hard to find. I looked at Michaels and Joanns, but they didn't have them there.  I finally found them at Artco in the center isle, not with the other magnets.  I know you can order them online too, but I was too impatient didn't have time.
  • Make sure you round the corners of the flaps before you glue everything together and add the brads. Oops!
  • Let me know if you have any questions!


Pin It

Tuesday, April 10, 2012

Studio J: Love Your Layout with Stella Patterns

Pin It Check out this great Studio J idea!  Give it a try here.
Pin It